Introduction
An Arduino processor is nothing more than a regular AVR ATmega chip with a special bootloader program flashed on to it. Getting this bootloader on is actually quite simple when you know all the facts. The Arduino web page was quite lacking in details and many of the guides out there seem incomplete or outright incorrect. I made this quick guide to set you straight on what you need to do to get the bootloader onto the latest Arduinos.
Getting Started
First you'll need a programmer and some flashing software. In this guide I am going to use the AVRDUDE program. It works on any OS and supports tons of programmers. My personal favorite programmer is a Bus Pirate but you may also use any of the other supported AVR programmers on the market or even another Arduino.
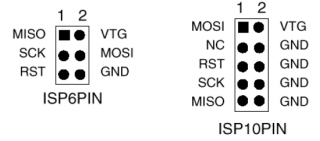
If the chip is already on a board you can use the 6 pin ICSP header to flash the chip in place (see pinout below). If there is no ICSP header you'll have to either hook up the pins manually or you can purchase our ATPirate Adapter Kit (DIP package only).

Flashing
Starting with the Uno, Arduinos now come with the Optiboot bootloader. You can download the latest version from their git repository. You'll want to grab the latest .hex file for your your combo of board and chip. As you can see it is also available for older Arduinos as well. The following examples will assume you have an Uno compatible board.
ATmega chips have a special area for a bootloader up to 2KB in size. If you have a brand new chip it will come ready to install a bootloader. If you are upgrading a chip with a bootloader already installed you will need to unlock the bootloader section of the chip with the following command:
avrdude -c buspirate -p m328p -P /dev/ttyUSB0 -U lock:w:0x3f:m
Now that the chip is unlocked we'll set some fuses, flash the bootloader and lock the bootloader section:
avrdude -c buspirate -p m328p -P /dev/ttyUSB0 -U efuse:w:0x05:m -U hfuse:w:0xD2:m -U lfuse:w:0xFF:m -U flash:w:optiboot_atmega328.hex -U lock:w:0x0F:m
Fuses are a special section of the chip that toggle certain features on or off. You can find more about the fuses from the ATmega spec sheets or by using an AVR fuse calculator. It may be possible to temporarily render the chip unusable if you set the wrong fuses (like setting an external clock when you have none) so be careful.
If everything flashed and verified okay, you should now have a working bootloader. Power cycle the Arduino, load up a test sketch, and marvel at your hardware hacking skills.